Everything is bigger in Texas. The restaurants, houses, highways, cars…even the tamales. Well, when there’s a tamale novice making them, that is! (Yes, I’m referring to myself.) While not a novice tamale lover or eater, I definitely struggle with the spreading, folding, and proportioning side of things, which led to some laughably gigantic tamales that definitely weren’t Texas appropriate. (If my mother in law’s smoothly spread, nicely proportioned tamales are any indication, they’re expert tamale makers down here.) By the way, hers are the ones pictured. I had to move mine out of the way when taking photos!
This is also her family recipe, which she shared with us last year when our Christmas tamale making tradition started. I had every intention of writing a post about them then, but never got around to it. So this year, I’m making sure to share the tamale love. Fair warning, the recipe doesn’t have any measurements – it’s a “do by feel” kind of process which is actually much more my speed. (I never measure when I’m not creating or testing blog recipes!) That said, I think it’s pretty forgiving and easy to follow, if fairly time consuming. Making tamales is a multi-hour process that is best done with friends, family, or both. In addition to yielding deliciousness, it’s quite fun!

A couple notes about the recipe:
-The masa mixture is made with dried ancho chiles, which are typically sold in big, open bins. When selecting them, look for ones that are on the softer side. (They should bend without cracking.)
-You will need a large work surface, and you can expect it to get messy! We covered the dining room table with a plastic tablecloth to make clean-up easier.
-As mentioned above, this recipe does not include specific measurements. It’s a “do by feel” process! In keeping with that spirit, I’ve listed some filling ideas but haven’t provided a specific recipe. Have fun and be creative!
-I’ve tagged this recipe as dairy-free, vegan, low-fodmap, and nut-free since there’s no dairy, eggs, nuts, or high-fodmap ingredients in the actual masa mixture. Obviously, the filling is up to you!
-I apologize for the lighting in these photos. We made these after the sun went down, and the dining room has a great work space but not the best lighting …
Christmas Tamales
1. Make the masa mixture
- Maseca (instant corn masa flour)
- Salt
- Baking powder
- Dried ancho chiles (see note for selecting)
- Fat (we did one batch with melted red palm oil and the other with melted coconut oil – they were both great)
- Hot water
Cut the tops off each ancho chile and shake out the seeds. Place the chiles in a saucepan and add enough water to cover them. Bring to a boil and then boil for 10-15 minutes, until very soft. Puree about equal parts chiles and water in a blender until smooth. Add additional water or chiles as necessary until the mixture is about the consistency of barbecue sauce or a runny pureed soup.
Pour desired amount of maseca flour into a few different large, wide containers. (Splitting up the maseca into different vessels makes it easier to work the dough.) Add salt and a little baking powder. Gradually add hot water to the masa while kneading it with your hands until you reach the consistency of playdough. The mixture should not crack or feel hard. Then spoon a generous amount of the melted red palm oil or coconut oil over the masa and continue kneading it. Finally, add a few spoonfuls of the chile mixture and work it in. The mixture should be very soft, elastic, playdough consistency that does not stick to your hands.
2. Prep some fillings
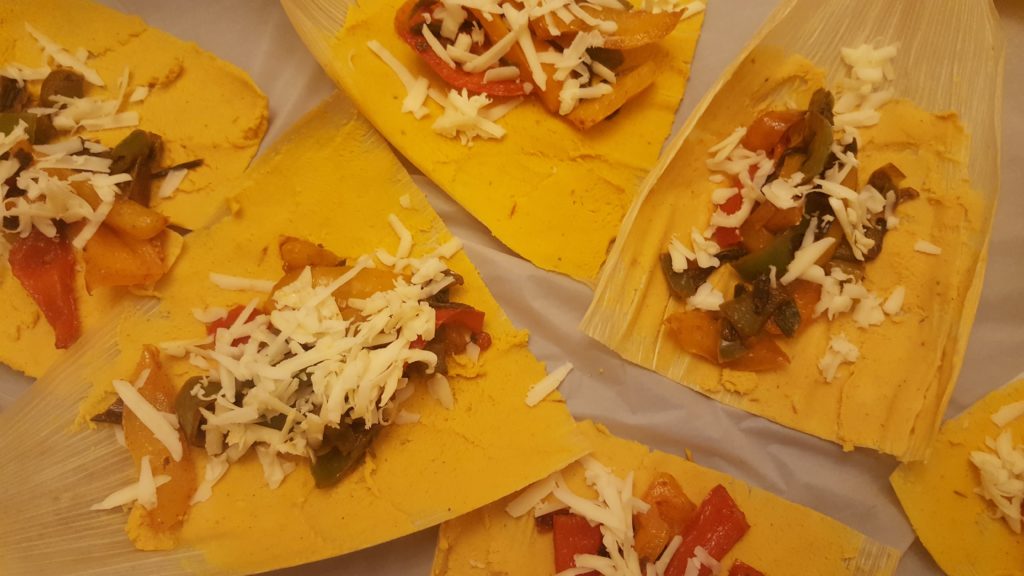
You can fill your tamales with all manner of things. Spinach & cheese is a great choice because you don’t have to cook the spinach – it will steam along with the tamales. Simply grate some cheese and get some spinach out of the fridge and you’re ready to fill! Cinnamon and sugar is also delicious for sweet tamales, or if you’re feeling punchy, a mixture of cheeses with some pickled jalapeños is also a wonderful filling option. There’s nothing wrong with just cheese, either! Pictured below are sautéed tri-colored peppers with cumin, paprika, and oregano to which we added some grated cheddar when filling, and a kale and tomatillo filling (blanched kale and sauteed tomatillos) to which we added feta.


3. Assemble the tamales
- Husks
- Hot water
- Prepped masa from Step 1
- Your fillings from Step 2
First, prep the husks. Soak them in hot water for 10-15 minutes and then squeeze out the excess water. Next, check the consistency of your masa. If it’s been sitting for a while, you may need to work in some more hot water and/or oil. Remember, it should be the consistency of very soft playdough.
Grab one of the husks. It has a smoother side and a bumpier side. It also has a wider end and a narrower end. You want to spread your masa on the wider end of the smoother side. Using the back of a spoon, spread a relatively thin layer of masa on the bottom half (wider end) of the smooth side of each husk. If the masa doesn’t stick to the husk, you may need more oil in your mixture. If you are having trouble with the spoon (I was), you could also use the palm of your hand or try pressing the dough into the husk. Just try not to use too much dough in one tamale – see the photo below for guidance.
Next, place your filling in a vertical line down the middle of your masa. Fold each edge of the husk in, and tuck the narrow end under. If the tamale husk is too small and needs some extra help to stay together, take a piece of another husk and wrap it around the outside.
4. Steam the tamales
- The assembled tamales from Step 3
- Extra soaked husks from Step 3
- A large, tall pot
- A small, round pot or heat-proof container
- Hot Water
Place the small, round pot in the center of the large, tall pot. Line the bottom of the large pot with pieces of husks. Then, stand the tamales up vertically, open-side up. (The small pot in the center will help you do this but it’s best if you have at least two people – one to hold the growing pile of tamales in place until they stand together on their own.) Place the pot on the stove and pour hot water around the tamales so they have liquid to steam in. Cover the pot and steam on medium heat for 1.5-2 hours. Check on them to make sure they still have steaming liquid! The tamales are done when – upon opening – the masa easily comes off the husk.

Tamales in the pot
Note: If enjoying immediately, let the tamales stand for a few minutes after opening so they firm up some. They tend to be a bit too soft right after cooking.
Serve with salsa, fresh grated cheese, avocado, etc.!
Leave a Reply